A tiny landscape on bark: make a lichen texture map
What looked like a paint splash has an edge, a texture and a place you can find again. Make a small map without needing a species name.
From a stain to a small landscape
A patch on a tree can look like a splash of paint until you notice its edge. Is it flat against the bark, folded into little lobes, or branching out into the air? Choose one patch and make a map small enough to fit in your notebook. You can finish with a useful record even if its name remains a question.
You need paper and a pencil. A hand lens, phone camera and ruler are optional. Start with a reachable patch on a tree trunk, an old wall or a stone. Keep the patch undisturbed: look, sketch and photograph without scraping or peeling it.
First, look for an edge
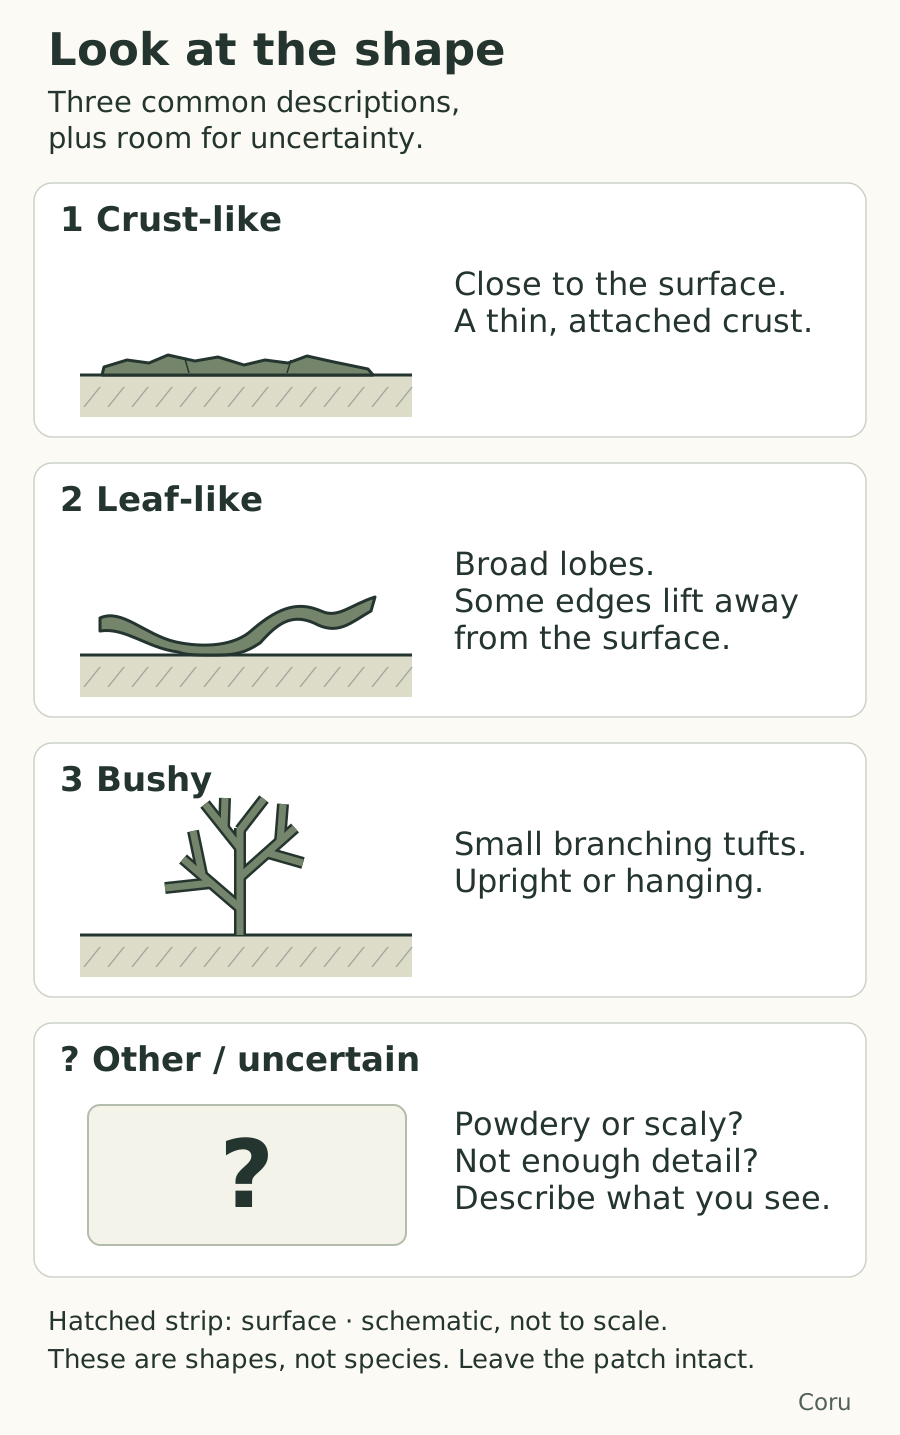
A lichen brings a fungus together with algae and/or cyanobacteria that use light to make food. It can have a surprisingly elaborate visible body. Three common descriptions are crust-like, leaf-like and bushy. Powdery and scaly forms occur too, so those three labels are not a complete identification key.
Find one boundary between the patch and its surroundings. Trace it with your eyes. Does it lie close to the surface? Does it form broad lobes? Do small branching tufts stand up or hang from it? If you cannot tell whether you are seeing lichen, moss or a surface film, write “uncertain” and describe the visible feature. Colour alone is not enough for this task.
Look at the patch from a second angle if you can do so comfortably. If you want to record an approximate visible width, hold a ruler beside the patch in the same plane, without touching it. Record the units. Otherwise, leave the measurement blank.
Names you may meet in a guide: crustose (crust-like), foliose (leaf-like) and fruticose (bushy).
Give your patch an address
Draw a quick locator: the tree fork above it, a crack in the wall, or another feature you will recognise later. Record the surface, approximate height above ground with units, and how many minutes you spend looking. If you know the tree species or wall material, add it; otherwise leave it unknown.
Note whether the patch is in sunlight or shade at the time of your visit. Record “looks dry”, “looks wet” or “uncertain”. A shaded moment does not tell you whether that spot receives sunlight later.
If you use a camera, take one photograph that shows the surroundings and one close view. Write their filenames or numbers beside your sketch. A close-up becomes much more useful when you can find the same patch again.
Make the texture map
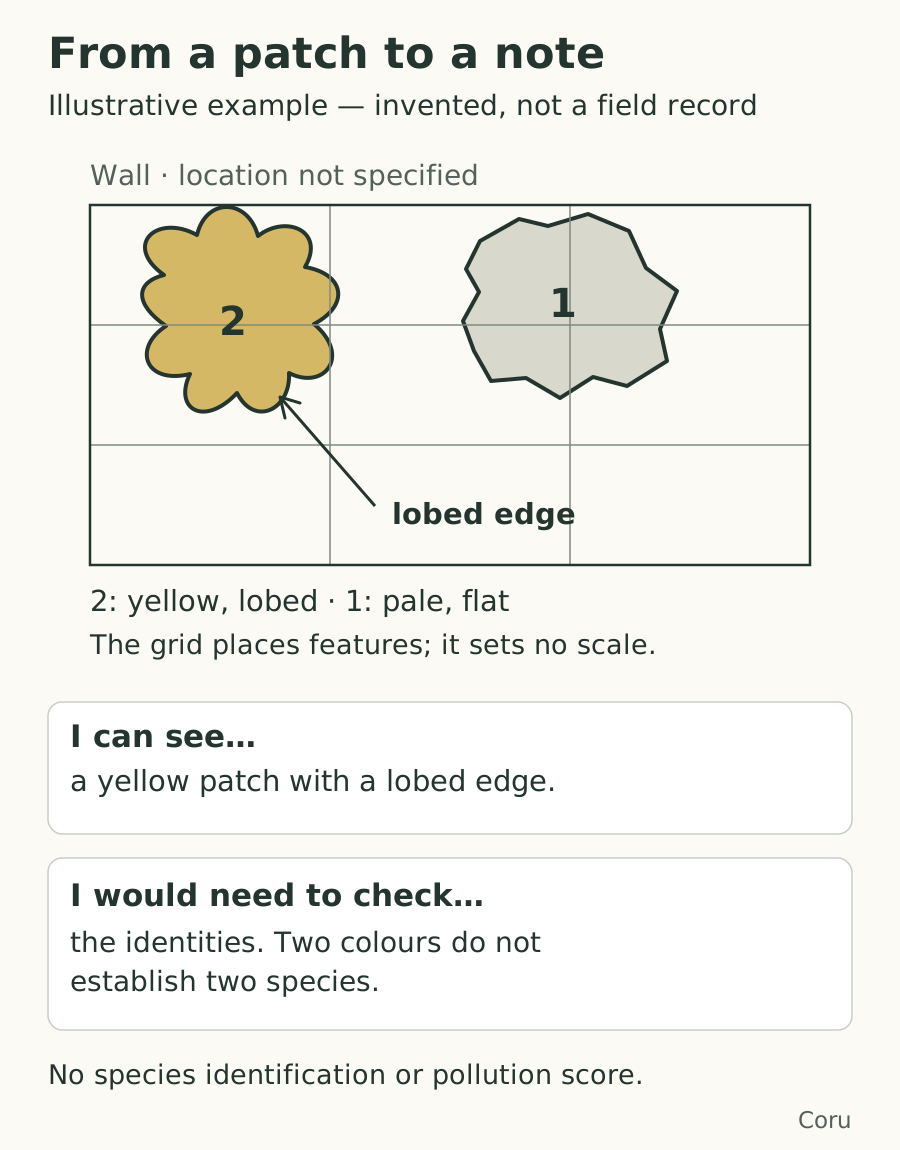
Divide a small rectangle on your paper into nine boxes, three across and three down. Sketch the patch’s outline across that grid. The boxes help you place features; they are not a scientific sampling grid and have no fixed real-world size.
Add these labels only where the appearance is clear:
- 1 — crust-like: a patch that appears closely attached to the surface.
- 2 — leaf-like: visible lobes that resemble little leaves.
- 3 — bushy: small branching tufts, which may stand or hang.
- ? — other or uncertain: describe what you can actually see.
Keep the observation and the question
Add a colour note and an arrow to one interesting edge. Do not turn every colour or separated patch into a different species. Your map records appearances, not a species count.
Below it, finish two sentences: “I can see…” and “I would need to check…”. For example, a lobed edge may be visible while the identity remains unresolved. That is a complete observation, not a failed identification.
What can your note support?
Read the imaginary record, choose one sentence, then open the answer explanations to check your reasoning.
Answers and explanations
- The two colours belong to two different species.: The record describes colours, not identified species. More identification evidence is needed.
- The yellow patch has a lobed edge.: Yes. That feature is explicitly recorded; no species name or cause has been inferred.
- The air on this street is clean today.: No pollutant measurement was made. Finding lichen cannot establish today’s air quality.
- The wall’s chemistry caused the patches to grow here.: The surface may matter, but this observation does not test that cause.
Compare a second patch, if you want
Spend roughly the same amount of time on another nearby patch. Record its surface and conditions again. Write one visible difference, then two possible explanations that you have not tested.
Moisture, shade, the surface itself and nutrient enrichment can all affect lichen communities. Bark properties matter, and rock or mortar can create different conditions. A wall and a tree therefore make an interesting comparison, but they do not isolate one cause.
Keep “not seen during this visit” separate from “absent”. Different viewing angles, time spent looking or an unclear boundary may change what you notice.
A lichen is not a pollution reading
Finding lichen does not prove that the air is clean. Different lichens respond differently to pollutants; some tolerate or benefit from nitrogen enrichment.
To take part in environmental monitoring, use an appropriate method. The official Lichens GO programme studies tree lichens with a defined protocol and describes effects accumulated over years, complementary to measurement sensors. Follow the programme’s current protocol if you want to contribute to that project. This texture map does not produce that assessment or a reading of today’s air.
Your result is smaller and still worthwhile: a place you can relocate, a feature you have looked at closely, and a question precise enough to investigate. On a later visit, start by finding the same edge. You may not see any increase in size on a later visit: lichens can establish and grow slowly.
Take a blank sheet on your walk
The one-page sheet has room for a locator sketch, a 3 × 3 texture map and a second-patch comparison. Choose A4 or US Letter; a pencil and ordinary paper also work.
Download the lichen observation sheet — A4
One blank page. Print at actual size or fit to your paper; the drawing grid has no fixed physical scale.
Download the lichen observation sheet — US Letter
One blank page. Print at actual size or fit to your paper; the drawing grid has no fixed physical scale.
Sources & further reading
- Royal Botanic Garden Edinburgh — Lichens and Urban Air Pollution FAQ: partners, visible forms, observation and growth
- British Lichen Society — Lichen Ecology: surfaces, habitat and pollution responses
- Lichens GO — programme and limits of its environmental monitoring
- Lichens GO — current field protocol
- Lichens GO — glossaire : crustacé, foliacé, fruticuleux